

Introduction
Crème brûlée is a timeless French dessert known for its silky custard base and an irresistible caramelized sugar crust. The contrasting textures of creamy custard and crisp sugar make it a favorite among dessert enthusiasts. However, while the custard’s preparation is straightforward, creating the perfect brûlée top can be a challenge for many home cooks.
A well-executed crème brûlée top should have a glossy, golden-brown surface that cracks audibly when tapped, revealing the smooth custard beneath. This caramelized layer not only adds a delightful crunch but also enhances the dessert’s flavor with its sweet, slightly bitter notes.
In this guide, we’ll walk you through everything you need to know to achieve the perfect brûlée top, from preparing the base to caramelizing the sugar, troubleshooting common issues, and serving it with finesse. Whether you’re a seasoned baker or trying crème brûlée for the first time, these steps will help you master this classic dessert.
How to Make a Crème Brûlée Top with Perfect Results
Before you focus on the brûlée top, it’s essential to ensure the custard base is prepared and ready. A stable, chilled custard provides the perfect surface for caramelizing the sugar.
Preparing the Custard for a Perfect Crème Brûlée Top

The base of crème brûlée is a rich, creamy custard made from a simple mixture of heavy cream, egg yolks, sugar, and vanilla. Baking it correctly is crucial for a smooth and velvety texture.
- Use a Water Bath: Place your ramekins in a baking dish and fill the dish with hot water until it reaches halfway up the sides of the ramekins. This ensures even cooking and prevents the custard from curdling.
- Check for Jiggle: Bake the custards at 325°F (160°C) until the edges are set, but the center still jiggles slightly when shaken. Overbaking will result in a dense texture.
- Cool Completely: Remove the ramekins from the water bath and let them cool at room temperature for about 30 minutes before refrigerating.
Chilling the Custard to Set the Base for Your Brûlée Top
Proper chilling is just as important as baking. It ensures the custard is firm and cold, making it easier to create a crisp caramelized layer.
- Refrigerate for at Least 4 Hours: Chill the custards uncovered to prevent condensation from forming on the surface. Overnight chilling is even better for developing flavors and texture.
- Ensure a Dry Surface: Before adding sugar, gently pat the surface with a paper towel to remove any moisture. A dry surface ensures even caramelization.
By taking the time to properly prepare and chill your custard base, you’ll create the perfect foundation for a crackling crème brûlée top.
Choosing the Best Sugar for Your Crème Brûlée Top
The type of sugar you use plays a significant role in creating the perfect caramelized crust for crème brûlée. The right sugar not only melts evenly but also enhances the flavor and texture of the top layer. Here’s a detailed look at the sugar options and their effects.
Why Granulated Sugar is Ideal for Caramelizing a Crème Brûlée Top
Granulated sugar is the most commonly used choice for a crème brûlée top, and for good reason:
- Smooth Caramelization: Its fine texture allows it to melt evenly under the heat, creating a uniform, glassy crust.
- Neutral Flavor: Granulated sugar has a neutral sweetness, ensuring the caramelized layer doesn’t overpower the creamy custard beneath.
- Ease of Availability: It’s a pantry staple, making it the most convenient option for home cooks.
Pro Tip: For best results, choose a fine granulated sugar to ensure it distributes evenly and caramelizes quickly.
Turbinado and Demerara Sugar for a Thicker Brûlée Sugar Top
For a twist on the traditional crème brûlée top, consider using turbinado or demerara sugar. These sugars are less refined and have larger, golden-brown crystals.
- Enhanced Flavor: They impart a slightly more complex flavor with hints of molasses or caramel.
- Crunchier Texture: The larger crystals create a thicker, crunchier crust, which some people prefer.
- Rustic Appearance: The finished crust has a slightly more textured and rustic look compared to granulated sugar.
Pro Tip: Turbinado or demerara sugar may take a bit longer to melt and caramelize, so keep the flame moving steadily if using a torch, or watch carefully if broiling.
Mixing Sugars for a Unique Crust
You can also mix granulated sugar with turbinado or demerara sugar to get the best of both worlds:
- Smooth Finish: The granulated sugar ensures an even caramelization.
- Bold Flavor: The specialty sugars add depth and texture to the final crust.
Sugars to Avoid
While experimenting is fun, certain types of sugar don’t work well for a crème brûlée top:
- Powdered Sugar: It tends to burn quickly and doesn’t caramelize evenly, leading to a patchy or bitter crust.
- Brown Sugar: Its high moisture content can cause uneven melting and may result in a sticky, soft top rather than a crisp crust.
How Much Sugar to Use
The amount of sugar is also crucial to achieving the ideal caramelized top. A thin, even layer works best:
- Use 1-2 teaspoons of sugar per ramekin, depending on the size.
- Tilt and rotate the ramekin to distribute the sugar evenly across the surface.
- Tap off any excess sugar to avoid thick or uneven spots that may burn.
By selecting the right sugar and applying it in a thin, uniform layer, you set the stage for a flawless, golden-brown crust that complements the creamy custard perfectly.
Tips to Evenly Layer Sugar for a Crackling Crème Brûlée Top
Creating an evenly distributed sugar layer is essential for achieving a consistent and crackling crème brûlée top. Uneven sugar layers can lead to burnt patches or soft spots, so precision is key. Follow these steps to ensure a smooth, uniform surface ready for caramelization.
1: How to Spread Sugar Perfectly for a Smooth Crème Brûlée Top
- Use 1-2 teaspoons of sugar per ramekin. This amount is enough to create a thin, even layer without overwhelming the custard.
- Adjust the quantity slightly based on the size of the ramekin, but avoid using too much, as a thick layer can burn on the outside before melting completely.
2: Mistakes to Avoid When Preparing a Brûlée Sugar Top
- Hold a small spoon over the chilled custard and sprinkle the sugar evenly across the surface. Start in the center and work your way to the edges, ensuring full coverage.
- Avoid dumping the sugar in one spot, as this can create clumps that are difficult to spread.
3: Distribute the Sugar
Once the sugar is added, take a few moments to evenly spread it across the surface:
- Tilt the Ramekin: Gently tilt and rotate the ramekin in a circular motion to distribute the sugar. The goal is to create a smooth layer without gaps or ridges.
- Use a Finger or a Knife: For stubborn spots, lightly smooth the sugar with the back of a knife or your finger. Be careful not to press into the custard.
4: Remove Excess Sugar
To prevent the sugar layer from being too thick:
- Hold the ramekin over the sugar bowl and gently tap the side to shake off any excess sugar.
- Check the surface to ensure it’s even. If any bare spots remain, sprinkle a tiny amount of sugar to fill them in.
5: Ensure a Dry Surface
Moisture on the custard’s surface can lead to uneven caramelization:
- Before adding sugar, gently blot the top of the custard with a paper towel to remove any condensation.
- A dry custard surface allows the sugar to melt more uniformly, resulting in a smoother crust.
Why an Even Layer is Important
A properly distributed sugar layer ensures:
- Consistent Caramelization: Even heating allows the sugar to melt and brown uniformly without burning or leaving raw spots.
- Perfect Crack: A smooth, evenly spread sugar layer hardens evenly, making it easy to achieve that satisfying crack with a spoon.
- Balanced Sweetness: Thin, consistent layers of sugar enhance the dessert without overwhelming the delicate flavor of the custard.
With these steps, your crème brûlée will be ready for the final step: caramelizing the sugar into a golden, crackling crust.
How to Caramelize Sugar for the Perfect Crème Brûlée Top
Caramelizing the sugar is the defining step in creating a signature crème brûlée top. This process involves melting the sugar layer into a smooth, golden-brown crust that adds both flavor and texture. There are two primary methods for caramelizing sugar: using a kitchen torch or a broiler. Each offers unique benefits, and your choice may depend on the tools available.
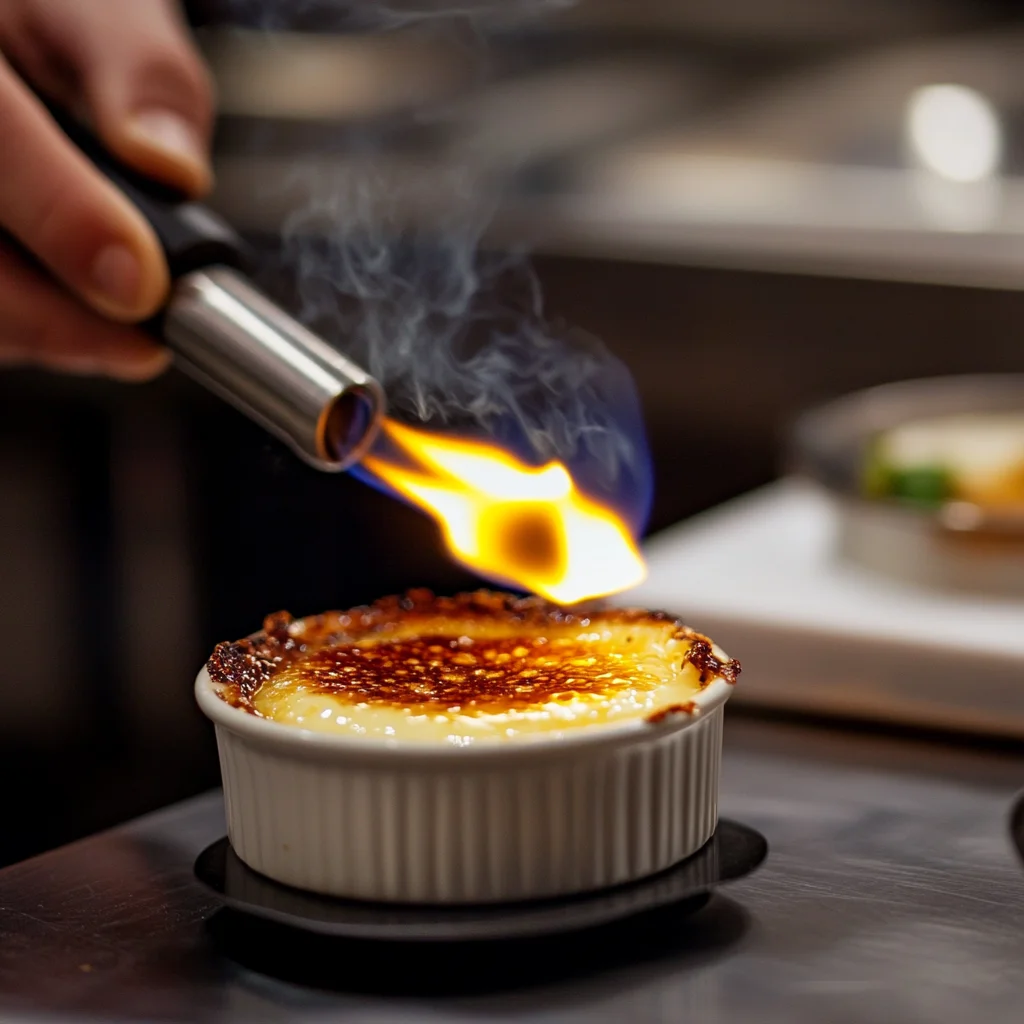
Using a Kitchen Torch to Make a Crème Brûlée Top
A kitchen torch provides the most control, allowing you to caramelize the sugar evenly and precisely.
- Set Up Your Workspace:
- Place the ramekins on a heat-resistant surface, such as a countertop or a baking sheet lined with foil for easy cleanup.
- Ensure the sugar layer is evenly distributed across the custard.
- Prepare the Torch:
- Fill your culinary torch with butane, following the manufacturer’s instructions.
- Light the torch and adjust the flame to a medium size. A smaller, controlled flame offers more precision.
- Caramelize in Sections:
- Hold the torch about 2-3 inches away from the sugar layer.
- Move the flame in small, circular motions, focusing on one area at a time.
- Allow the sugar to melt and bubble until it turns a golden amber color. Avoid lingering too long in one spot to prevent burning.
- Even Out the Caramelization:
- Continue moving the flame until the entire surface is evenly caramelized. A few darker spots are fine, but the majority should be a glossy golden brown.
Broiler Method: An Alternative Way to Create a Crème Brûlée Top
If you don’t have a torch, your oven’s broiler can be a reliable alternative for caramelizing the sugar.
- Preheat the Broiler:
- Set your oven’s broiler to its highest setting.
- Allow it to preheat for a few minutes to ensure even heat distribution.
- Prepare the Ramekins:
- Place the ramekins on a baking sheet for easy handling.
- Position the sheet on the top oven rack, about 4-6 inches from the broiler.
- Caramelize the Sugar:
- Slide the baking sheet under the broiler and watch carefully. The sugar will start to melt and bubble within 1-3 minutes.
- Rotate the baking sheet as needed to ensure even caramelization.
- Remove Immediately:
- Once the sugar turns golden brown, carefully remove the ramekins from the oven. Broiling happens quickly, so keep a close eye to avoid burning the sugar.
Tips for Perfect Caramelization
- Watch Closely: Whether you’re using a torch or a broiler, sugar caramelizes quickly. Stay focused to prevent burning.
- Avoid Overheating the Custard: Prolonged exposure to heat can warm or soften the custard beneath the sugar. If this happens, refrigerate the ramekins for 10-15 minutes to firm them back up.
- Test the Crust: After caramelizing, allow the ramekins to cool for 1-2 minutes. Tap the surface lightly with the back of a spoon to ensure the crust is hard and crackling.
What to Expect
- A properly caramelized crème brûlée top will have a glossy, golden-brown finish with no raw sugar remaining.
- The texture should be crisp and shatter under the spoon, providing a delightful contrast to the creamy custard below.
Now that your crème brûlée has its perfect caramelized top, it’s time to let it cool briefly and serve.
Troubleshooting Common Problems with Your Crème Brûlée Top
Once the sugar layer has been successfully caramelized, the next step is to allow the crust to cool and test its texture. This brief yet critical phase ensures that the caramelized sugar hardens properly into a crisp layer while the custard remains cool and creamy underneath.
Fixing a Soft or Sticky Crème Brûlée Sugar Top
After caramelizing, the sugar needs a short amount of time to set into a hard, crackable layer. Follow these steps:
- Let It Rest:
- Allow the crème brûlée to sit at room temperature for about 1-2 minutes after caramelization.
- During this time, the melted sugar cools down and solidifies into a glass-like surface.
- Avoid Refrigeration Immediately:
- Do not place the ramekins in the fridge immediately after caramelizing. The rapid cooling can cause the caramel to become sticky instead of crisp.
- Optional Cooling for Custard Stability:
- If the custard has softened slightly due to the heat from the caramelization process, you can refrigerate the ramekins for 10-15 minutes. This will firm up the custard without compromising the crispness of the crust.
Avoiding Burnt Spots on Your Brûlée Top
The hallmark of a perfect crème brûlée is its crackling sugar top. Here’s how to check for the right texture:
- The Spoon Test:
- Lightly tap the surface with the back of a spoon.
- A crisp, crackling sound indicates that the sugar has caramelized and hardened correctly.
- Visual Check:
- The crust should appear glossy and evenly golden-brown, with no visible patches of uncaramelized or burnt sugar.
- Any bubbling should have subsided, leaving a smooth, glass-like finish.
- Taste Test (Optional):
- If serving immediately, break through the crust with a spoon to test the texture. A clean crack should reveal the creamy custard beneath, creating the perfect contrast in texture.
What to Avoid
- Sticky or Soft Crust:
- This usually happens if the sugar layer was too thick, or if the caramelized top hasn’t been given enough time to cool. To fix this, try caramelizing a thinner layer of sugar next time.
- Overly Thick Caramel Layer:
- A crust that is too thick can overpower the delicate custard and make it difficult to crack. Always ensure the sugar layer is thin and evenly distributed before caramelizing.
Why Proper Cooling Matters
The cooling step ensures that:
- The caramelized sugar becomes crisp and shatterable.
- The custard retains its creamy, cold texture, providing the classic contrast that crème brûlée is known for.
- The dessert is ready to serve without sticking or softening prematurely.
Once your crust is set and passes the crack test, your crème brûlée is officially ready to dazzle your guests or satisfy your sweet tooth.
Serving and Enjoying a Perfectly Caramelized Crème Brûlée Top
Serving crème brûlée is the grand finale of this classic dessert. The moment guests crack through the caramelized top to reveal the creamy custard is a true delight. Here’s how to serve it beautifully and keep its textures intact.
When to Serve Crème Brûlée
Serve Immediately: Serve the dessert shortly after caramelizing for a crisp crust and creamy custard.
Short-Term Storage: If needed, store caramelized ramekins uncovered in the fridge for up to 1 hour.
Avoid Delays: Prolonged storage softens the crust as it absorbs moisture.
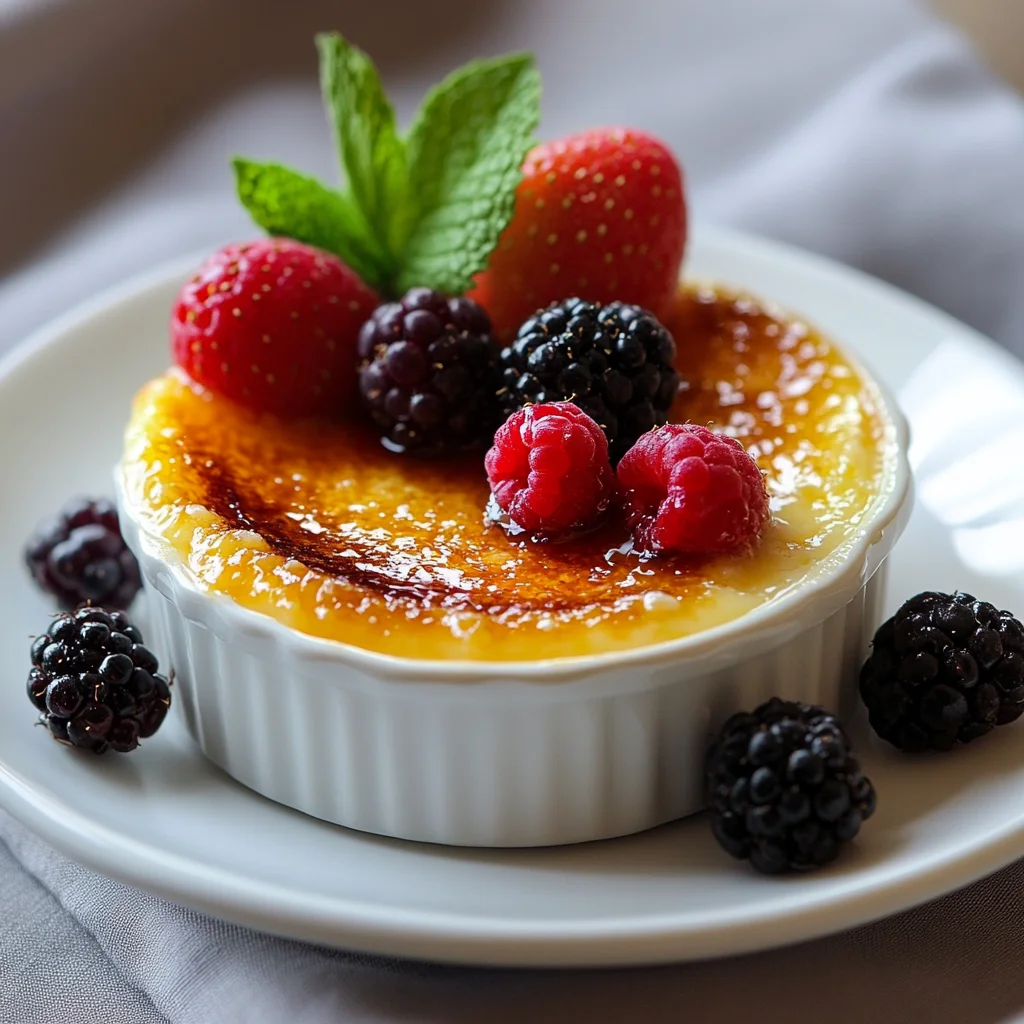
Presentation Tips
- Garnish Smartly: Use fresh berries, sliced strawberries, or a mint sprig for visual appeal.
- Elegant Ramekins: Decorative ramekins elevate the dessert’s presentation.
- Accompaniments: Serve with biscotti or fresh fruit for added texture.
How to Serve
- Place ramekins on a dessert plate with a napkin for stability.
- Use small dessert spoons for the signature “crack” through the caramelized crust.
Perfect Pairings
- Dessert Wines: Sauternes or Moscato enhance the caramel notes.
- Coffee or Tea: Pair with espresso or fragrant tea like chamomile for a balanced contrast.
Final Tip
Encourage guests to tap the crust for that satisfying crack, making the experience interactive and memorable.
Common Problems and Solutions
While making crème brûlée, challenges like burnt sugar or soft crusts can arise. Here’s how to troubleshoot common issues.
1. Burnt Sugar
Cause: Torch held too close or broiler overheats.
Fix: Keep the torch 2–3 inches away and use smooth, circular motions.
2. Uneven Caramelization
Cause: Uneven sugar layer or irregular heating.
Fix: Spread sugar evenly and rotate the ramekin or baking sheet for consistent browning.
3. Soft or Sticky Crust
Cause: Thick sugar layer or moisture on custard.
Fix: Use 1–2 teaspoons of sugar and pat the custard dry before caramelizing.
4. Overheated Custard
Cause: Prolonged heat during caramelization.
Fix: Work quickly with a medium torch flame or refrigerate to firm up custard.
5. Thick, Hard Crust
Cause: Excess sugar or over-caramelization.
Fix: Use a thin sugar layer and aim for light golden-brown caramel.
. Sugar Doesn’t Melt
Cause: Insufficient heat or preheating.
Fix: Use a stronger torch flame or preheat the broiler before caramelizing.
By refining these steps and addressing common issues, your crème brûlée will achieve the perfect balance of crispness and creaminess every time.
Frequently Asked Questions (FAQs)
1. Can I make the caramelized crust ahead of time?
It’s best to caramelize just before serving for maximum crispness. If needed, caramelize up to 1 hour ahead and store uncovered in the refrigerator to prevent the crust from softening.
2. What can I use if I don’t have a kitchen torch?
Use your oven’s broiler as an alternative. Place ramekins 4–6 inches under the broiler, watching closely to prevent burning. Rotate the baking sheet for even caramelization. A torch offers better control, but the broiler works in a pinch.
3. What type of sugar is best for caramelizing?
Granulated sugar is ideal for a smooth, crisp crust. For more texture and flavor, try turbinado or demerara sugar, but expect longer caramelization time. Avoid powdered or brown sugar as they burn easily and caramelize unevenly.
4. Why is my caramelized crust soft?
Soft crusts occur due to:
- Too much sugar: Use a thin, even layer.
- Excess moisture: Pat the custard dry before adding sugar.
- Incomplete caramelization: Ensure sugar melts fully to a golden-brown color.
5. Can I caramelize frozen or warm custard?
- Frozen custard: Not recommended; sugar may crack unevenly.
- Warm custard: May melt under heat. Always chill custard thoroughly for at least 4 hours before caramelizing.
6. How do I avoid burning the sugar?
Keep the torch moving in small circles, holding it 2–3 inches from the sugar. Under a broiler, monitor closely and remove once golden brown. Use a thin sugar layer for quicker, even caramelization.
7. Can I use flavored sugars or spices?
Yes! Try:
- Vanilla Sugar: Infuse with vanilla beans.
- Spices: Add cinnamon or nutmeg for a warm touch.
- Alcohol-Infused Sugar: Mix with Grand Marnier or rum; dry before caramelizing.
8. How do I clean ramekins after caramelizing?
Soak ramekins in warm, soapy water for 10–15 minutes to loosen hardened sugar. Gently scrub with a sponge. Avoid abrasive materials to protect the ramekin surface.
9. Can I make crème brûlée without eggs?
Yes, using substitutes like cornstarch, gelatin, or agar-agar. These create a creamy custard base but may slightly alter the flavor and texture compared to the traditional version.
10. Why isn’t my sugar melting evenly?
Uneven melting may result from:
Moisture: Dry the custard surface before adding sugar.
Uneven sugar layer: Spread sugar thinly and evenly.
Weak heat source: Use a medium-high torch flame or bring ramekins closer to the broiler.
How to Make a Perfect Crème Brûlée Top
Creating the iconic caramelized top of a crème brûlée is all about precision and technique. Begin by evenly sprinkling granulated sugar over the chilled custard surface. Use a kitchen torch to apply steady heat until the sugar melts, bubbles, and forms a golden, glassy crust. If you don’t have a torch, a broiler can also achieve the caramelized effect—just keep a close eye to avoid burning the sugar.
For more dessert inspiration, explore this elegant Crab Brûlée Recipe, which offers a creative seafood spin on brûlée techniques. If you’re craving something sweet but simple, learn How to Make the Perfect Bisquick Shortcake. For savory dishes, mastering The Perfect Patty is a must for any home cook.
Conclusion
Mastering the art of creating the perfect crème brûlée top is a rewarding process that elevates this classic dessert to new heights. From preparing a smooth custard base to selecting the right sugar, achieving an even layer, and caramelizing it to golden perfection, each step plays a critical role in crafting a dessert that delights both visually and texturally.
The hallmark of a well-made crème brûlée lies in the contrast between its crisp, caramelized sugar crust and the creamy, luscious custard beneath. Whether you use a kitchen torch for precision or a broiler for convenience, careful attention to detail will ensure your dessert has the signature crackling top that makes crème brûlée so beloved.
Even if you encounter challenges, such as uneven caramelization or soft crusts, the troubleshooting tips in this guide will help you refine your technique. Remember, practice makes perfect, and the satisfaction of breaking through that caramelized layer is well worth the effort.
Whether you’re making crème brûlée for a special occasion or simply to treat yourself, following these steps ensures a flawless dessert every time. Serve it fresh, garnish it beautifully, and let the delightful textures and flavors speak for themselves. Enjoy the sweet success of your perfectly caramelized crème brûlée top!